Hyper Editor in Logic Pro X might seem complex at first glance. It’s a powerful tool. It offers detailed control over MIDI data.
Understanding Hyper Editor
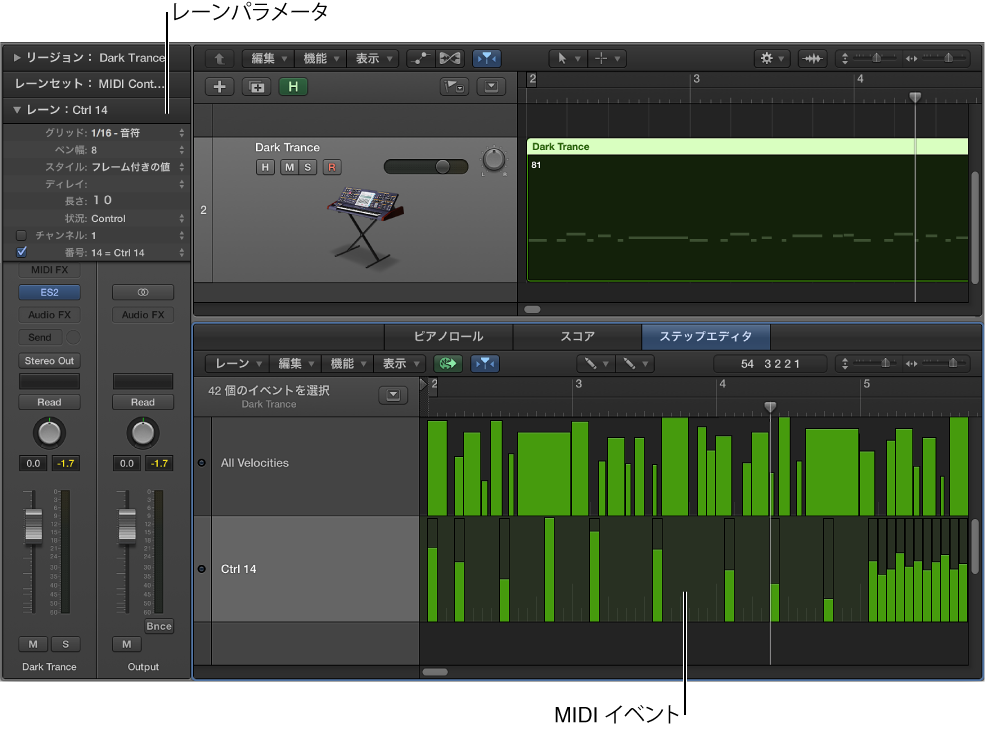
The Hyper Editor is a MIDI editing environment. It allows you to manipulate MIDI events in a graphical way. Think of it as a microscopic view of your MIDI data. It’s similar to a spreadsheet where each row represents a specific MIDI parameter. These parameters include note pitch, velocity, or controller data. Each column represents a time position.
Core Functionality
It allows editing MIDI data using lines and shapes. Hyper Sets define what parameters are edited. You can create your own Hyper Sets. This customisation is useful for specific editing tasks. This editor provides a visual and intuitive approach.
Why use Hyper Editor?
Complex MIDI editing is simplified with the Hyper Editor. You can create intricate patterns. You can also generate nuanced performances. It's valuable for detailed automation. It provides advanced control compared to the Piano Roll.
Teaching Hyper Editor in the Classroom
Introduce the concept gradually to students. Start with the basics of MIDI. Begin by explaining MIDI events like note-on, note-off, and velocity. Ensure they understand these fundamental principles. This forms a solid foundation.
Simplified Explanation
Explain that the Hyper Editor is like a graph. The x-axis represents time, and the y-axis represents the value of a MIDI parameter. Use simple examples. For instance, demonstrate how to draw a line to create a crescendo. Show how to edit velocity information of several notes at once.
Practical Demonstrations
Show real-world applications of the Hyper Editor. Recreate a familiar musical phrase. Modify its expression using velocity curves. Demonstrate how to change the pitch of notes over time. Illustrate the creation of rhythmic patterns by adjusting note lengths. Interactive, hands-on exercises are very effective.
Hands-on Activities
Assign small projects for students to explore. Have them create a simple drum pattern. Ask them to use the Hyper Editor to add variations in velocity. Get them to experiment with pitch bends or modulation. Provide them with clear instructions. Encourage exploration and creativity.
Common Misconceptions
Students often confuse the Hyper Editor with the Piano Roll Editor. It is important to differentiate the two. The Piano Roll primarily focuses on pitch and duration. The Hyper Editor handles a wider range of MIDI parameters. It allows for more complex manipulations.
Addressing the Confusion
Emphasize that while the Piano Roll is good for basic note editing. The Hyper Editor allows for more precise control over expression. The Hyper Editor allows for more complex rhythmic and dynamic variations. Show side-by-side comparisons. Highlight the strengths of each editor.
Overcoming the Fear Factor
Many students are intimidated by the visual complexity. Break down the interface into manageable parts. Start with editing only one parameter at a time. Gradually introduce more complex concepts. Encourage them to experiment. Assure them that mistakes are part of the learning process.
Making it Engaging
Use popular music examples to illustrate the power of the Hyper Editor. Show how producers use automation to create interesting effects. Demonstrate how synthesizers are controlled using MIDI CC messages. This makes the tool relevant to their musical interests.
Creative Projects
Assign creative projects that encourage experimentation. Ask students to design sound effects using automation. Have them recreate a famous synth line using MIDI controllers. Allow them to use the Hyper Editor to add their own creative touches. Encourage them to push the boundaries.
Gamification
Incorporate game-like elements. Create challenges where students have to replicate a specific MIDI effect. Offer rewards for the most creative or accurate implementations. Use leaderboards to foster healthy competition. Make learning fun and rewarding.
Tips and Tricks
Explore the different Hyper Sets to understand what they do. Create custom Hyper Sets. These sets can be tailored to specific instruments or editing tasks. Use the zoom function. It helps to see the data more clearly. Use the snap function. It ensures that edits align to the grid.
Practical Shortcuts
Learn keyboard shortcuts to speed up the editing process. Use the Option key to copy and paste sections. Use the Command key to select multiple points. Mastering shortcuts can significantly improve workflow.
Resources
Encourage students to explore online tutorials and forums. There are many resources available online. These offer step-by-step guides and advanced techniques. Apple's documentation is comprehensive. It can be a valuable resource for understanding the intricacies of the Hyper Editor. Share links to helpful resources. Encourage peer learning.
Conclusion
The Hyper Editor in Logic Pro X is a powerful tool. It enables precise control over MIDI data. By breaking down the concepts. By using practical examples. By addressing common misconceptions. Educators can empower students to master this tool. This will unlock new levels of creativity. It will elevate their music production skills.